2. Helen Hayes Model
Helen Hayes Sticking Instructions
| Description | MarkerName | FullBodyWithHead (29 Static) | FullBody (26 Static) | LowerBody (19 Static) | Drop location |
|---|---|---|---|---|---|
| Top | Top.Head | √ | At the center and top of the head | ||
| In front of the head | Front.Head | √ | At the front of the head | ||
| Behind the head | Rear.Head | √ | At the rear of the head | ||
| Left shoulder | L.Shoulder | √ | √ | The tip of the shoulder crest protrusion | |
| Right shoulder | R.Shoulder | √ | √ | The tip of the shoulder crest protrusion | |
| Left elbow | L.Elbow | √ | √ | Lateral Epicondyle | |
| Right elbow | R.Elbow | √ | √ | Lateral Epicondyle | |
| Left wrist | L.Wrist | √ | √ | Between the radial styloid process and the ulnar styloid process | |
| Right wrist | R.Wrist | √ | √ | Between the radial styloid process and the ulnar styloid process | |
| Offset point | R.Offset | √ | √ | The right scapula on the upper back causes the left and right markers asymmetry | |
| Left front waist | L.ASIS | √ | √ | √ | On the protruding skeleton on the left front pelvis |
| Right front waist | R.ASIS | √ | √ | √ | On the protruding skeleton on the right front pelvis |
| Upper Left Thigh | L.Thigh | √ | √ | √ | Middle thigh up 1 cm |
| Upper Right Thigh | R.Thigh | √ | √ | √ | Middle thigh up 1 cm |
| Left Lateral Knee | L.Knee | √ | √ | √ | Lateral protrusion of the knee joint axis |
| Right Lateral Knee | R.Knee | √ | √ | √ | Lateral protrusion of the knee joint axis |
| Left Medial Knee | L.Knee.Medial | √ | √ | √ | Medial protrusion of the knee joint axis |
| Right Medial Knee | R.Knee.Medial | √ | √ | √ | Medial protrusion of the knee joint axis |
| Left Lateral Ankle Joint | L.Ankle | √ | √ | √ | Lateral protrusion of the ankle axis |
| Right Lateral Ankle Joint | R.Ankle | √ | √ | √ | Lateral protrusion of the ankle axis |
| Left Medial Ankle Joint | L.Ankle.Medial | √ | √ | √ | Medial protrusion of the ankle axis |
| Right Medial Ankle Joint | R.Ankle.Medial | √ | √ | √ | Medial protrusion of the ankle axis |
| Left Toe | L.Toe | √ | √ | √ | Center of the foot, between 2nd and 3rd metatarsals |
| Right Toe | R.Toe | √ | √ | √ | Center of the foot, between 2nd and 3rd metatarsals |
| Left Heel | L.Heel | √ | √ | √ | Center of heel skeleton |
| Right Heel | R.Heel | √ | √ | √ | Center of heel skeleton |
| Left Shank Wand | L.Shank | √ | √ | √ | On lower shank, aligned with shank long axis and ankle flexion/extension axis |
| Right Shank Wand | R.Shank | √ | √ | √ | On lower shank, aligned with shank long axis and ankle flexion/extension axis |
| Sacrum | V.Sacral | √ | √ | √ | Superior aspect at the L5–sacral interface |
Helen Hayes Skeleton Description
| skeleton Name | Origin Marker | Long Axis | Plane Axis | Parent skeleton |
|---|---|---|---|---|
| Pelvis | V_Pelvis_Origin | V_Mid_Hip | V.Sacral | GLOBAL |
| R.Thigh | V_R.Hip_JC | V_R.Knee_JC | R.Knee | Pelvis |
| L.Thigh | V_L.Hip_JC | V_L.Knee_JC | L.Knee | Pelvis |
| R.Shank | V_R.Knee_JC | V_R.Ankle_JC | R.Ankle | R.Thigh |
| L.Shank | V_L.Knee_JC | V_L.Ankle_JC | L.Ankle | L.Thigh |
| R.Foot | V_R.Ankle_JC | R.Toe | R.Ankle | R.Shank |
| L.Foot | V_L.Ankle_JC | L.Toe | L.Ankle | L.Shank |
| Trunk | V_Pelvis_Origin | V_Mid_Shoulder | R.Shoulder | Pelvis |
| Head/Neck | V_Mid_Shoulder | Top.Head | Front.Head | Trunk |
| R.UpperArm | R.Shoulder | R.Elbow | L.Shoulder | Trunk |
| L.UpperArm | L.Shoulder | L.Elbow | R.Shoulder | Trunk |
| R.Forearm | R.Elbow | R.Wrist | L.Elbow | R.UpperArm |
| L.Forearm | L.Elbow | L.Wrist | R.Elbow | L.UpperArm |
| R.Hand | R.Wrist | V_R.Hand | L.Wrist | R.Forearm |
| L.Hand | L.Wrist | V_L.Hand | R.Wrist | L.Forearm |
| PelvisWRTLab | V_Mid_Hip | V_Pelvis_Origin | V.Sacral | GLOBAL |
| TrunkWRTLab | V_Pelvis_Origin | V_Mid_Shoulder | R.Shoulder | GLOBAL |
Helen Hayes Human Body Patch Diagram
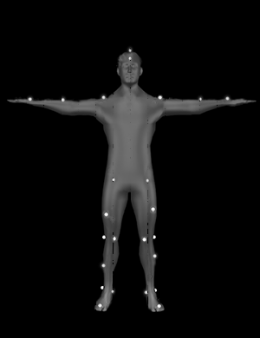
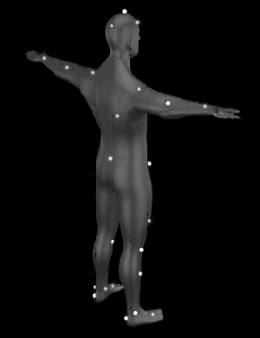
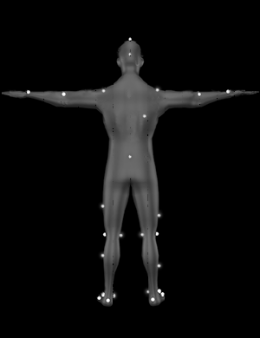
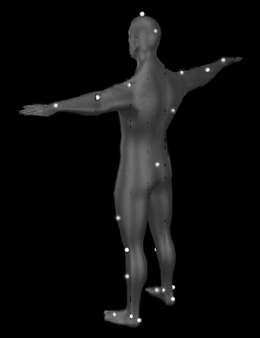
Helenhayes FullBodyWithHead(29 Static)
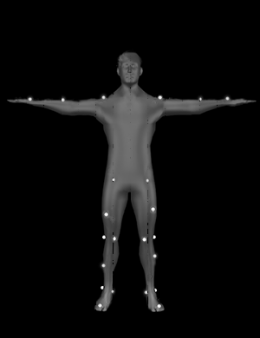
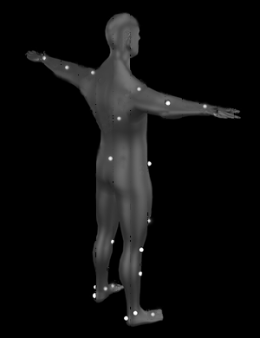
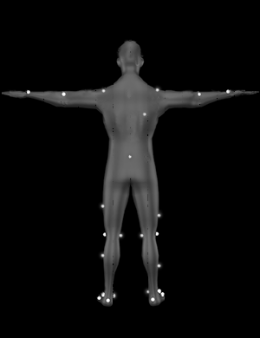
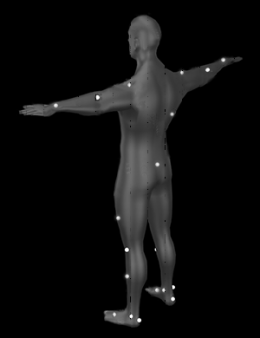
Helenhayes FullBody(26 Static)
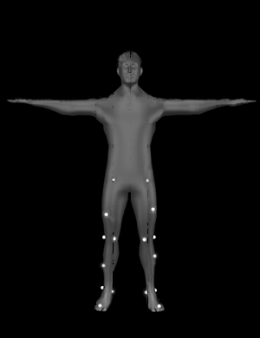
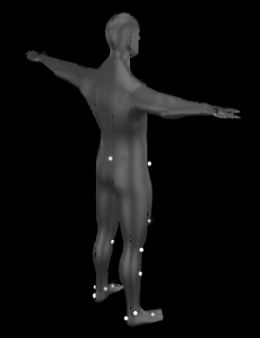
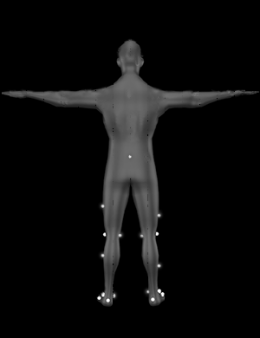
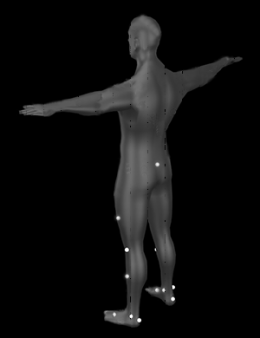
Helenhayes LowerBody(19 Static)