Open the Data Casting Pane and enable "SDK" in the software.
After successful calibration in XINGYING software, create a human model in Live mode or load a data set with a
MarkerSet human model in Edit Mode, and then play it in the software.
Depending on the version of UE used, download the corresponding NOKOVLiveLink plugin. The installation and usage
methods are consistent. For example, if you are using the UE_4.26 engine, please unzip the "NOKOVLiveLink1.XXX"
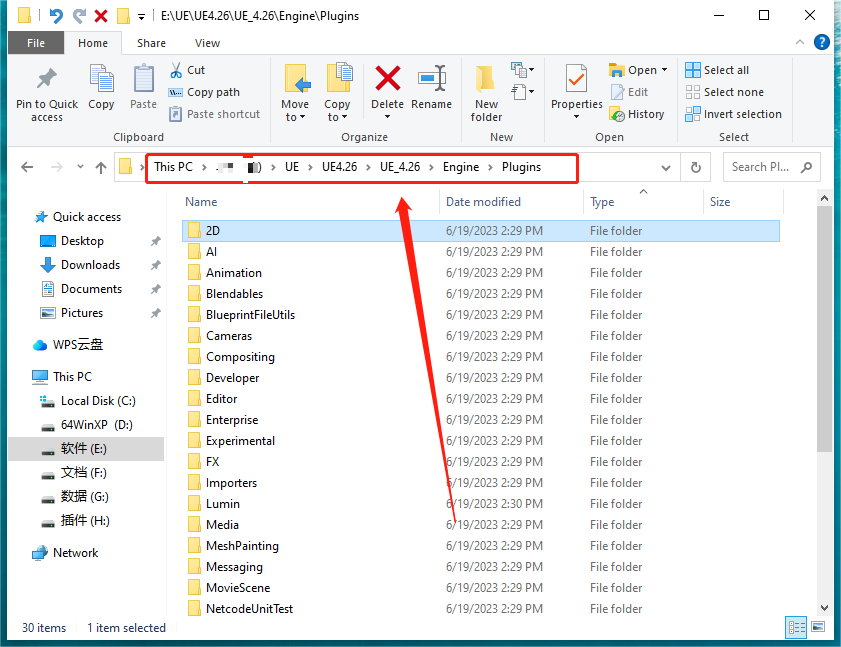
plugin version for the UE_4.26 engine and copy the entire plugin folder and paste it into the UE_4.26 engine path.
The specific path is "Epic games\UE_4.26\Engine\Plugins", and it will depend on the software in your computer.
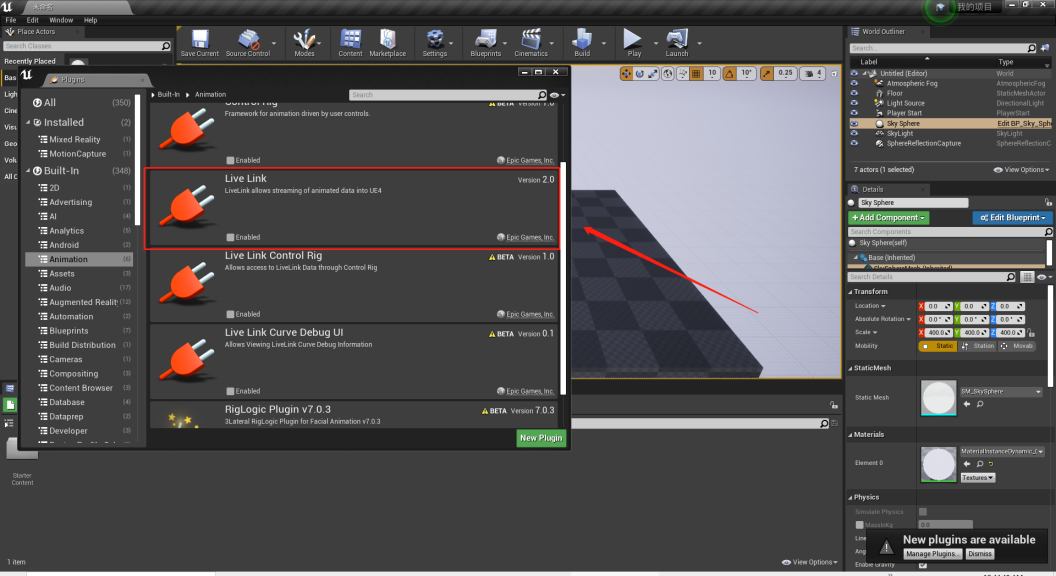
After copying the plugin folder for version 4.26 to the corresponding location, open the UE_4.26 engine and create a
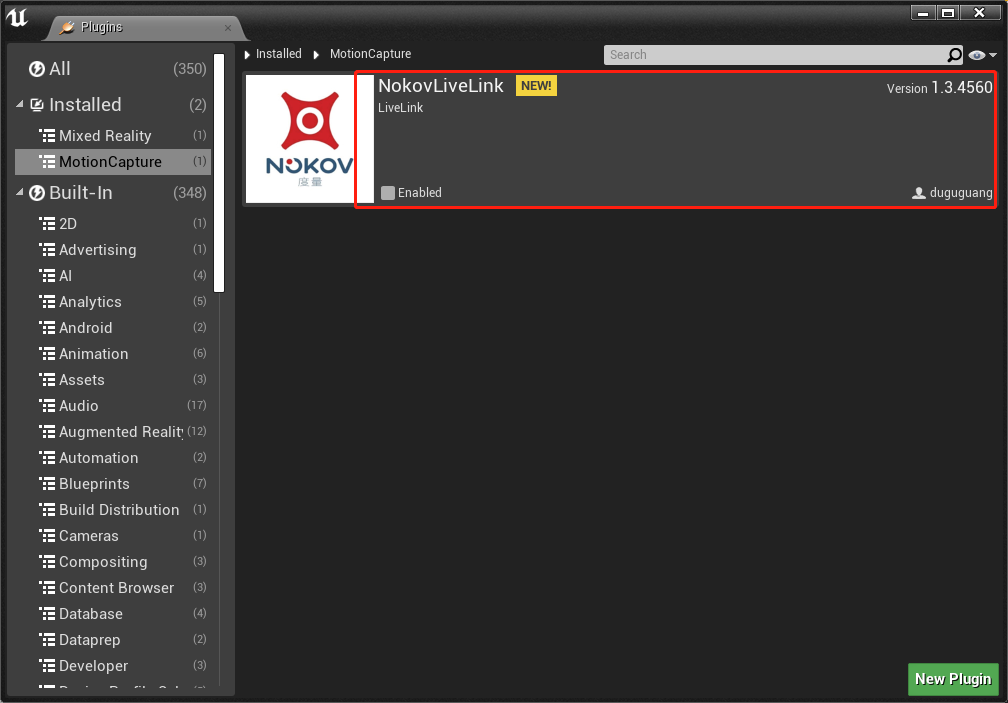
project. Go to "Edit—Plugins", check "Animation—Live Link" and "Motion Capture—NOKOVLiveLink" and restart the
software to activate the plugin. The steps are the same when using UE_4.27 or UE_5.0 or 5.1 engines;
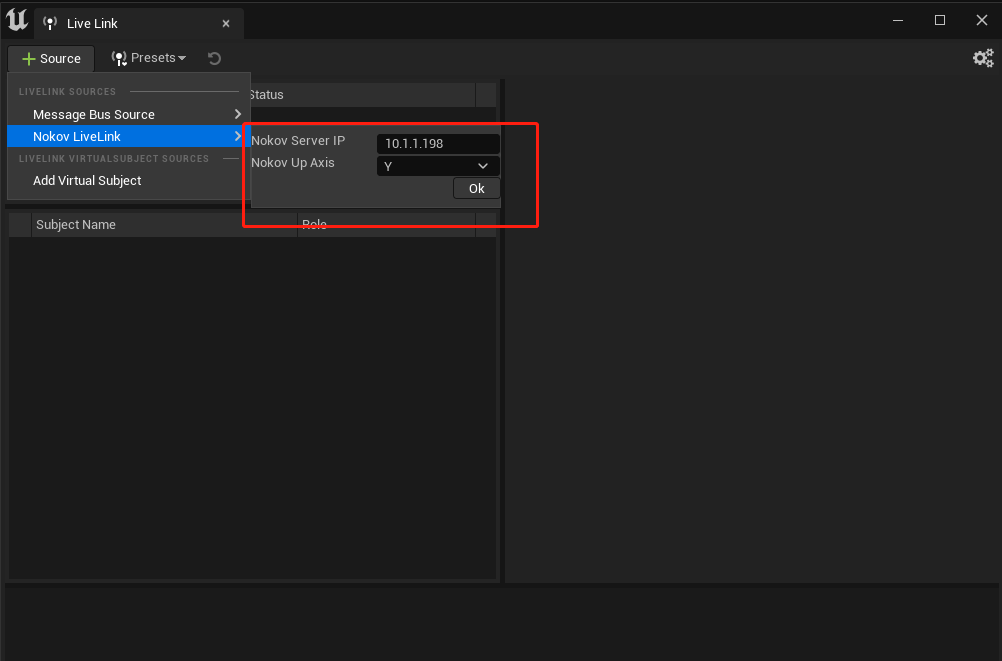
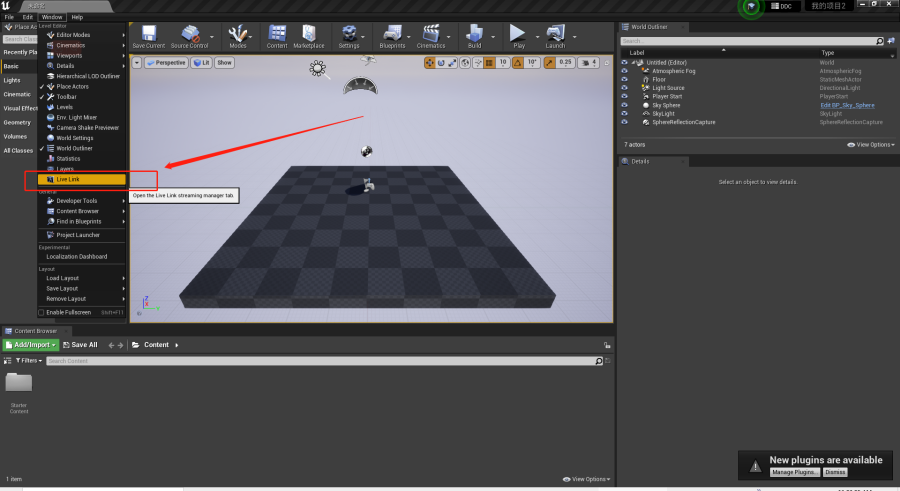
In UE_4.26, select "Window—Live Link" and click on "Source—NOKOV Live Link." The Server IP should be consistent with
the network card address set in the data broadcast panel of the XingYing software. The default is 10.1.1.198. Ensure
the Up Axis is consistent with the setup in XINGYING, and click OK. Play XINGYING to receive motion capture data, and
a green indicator light will illuminate.
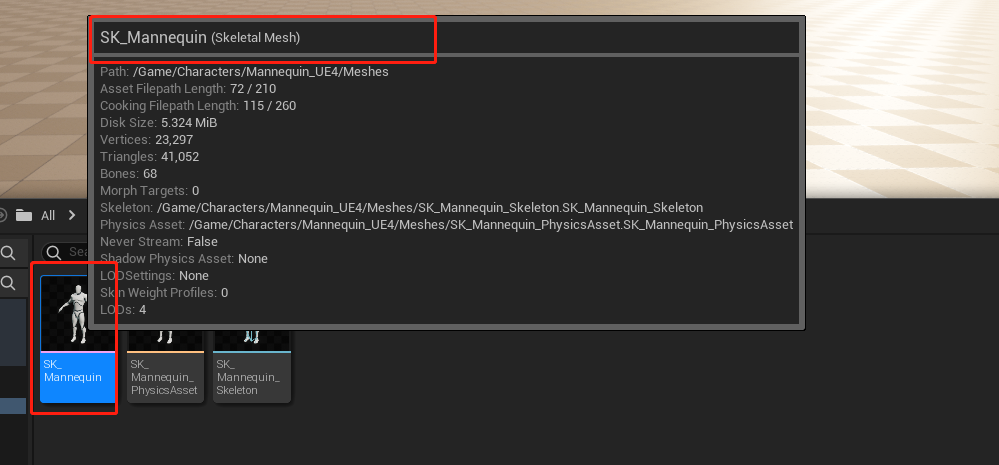
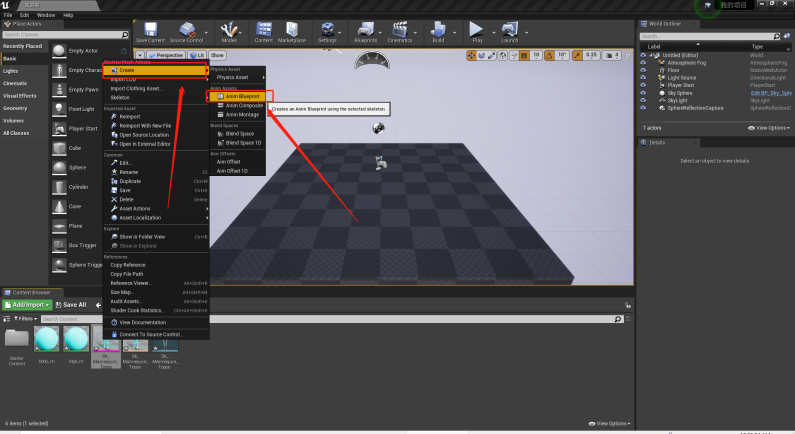
Create an Animation Blueprint by locating a skeleton with a "Skeletal Mesh" in the menu bar. Right-click on this
Skeletal Mesh, select Create, then Animation Blueprint Double-click to open the newly created Animation Blueprint.
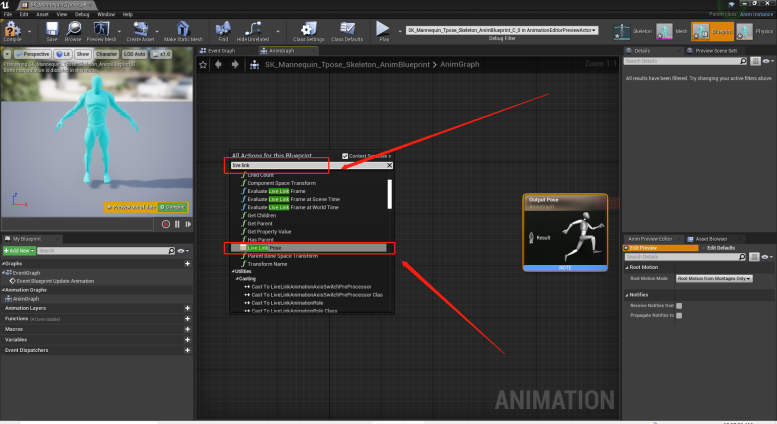
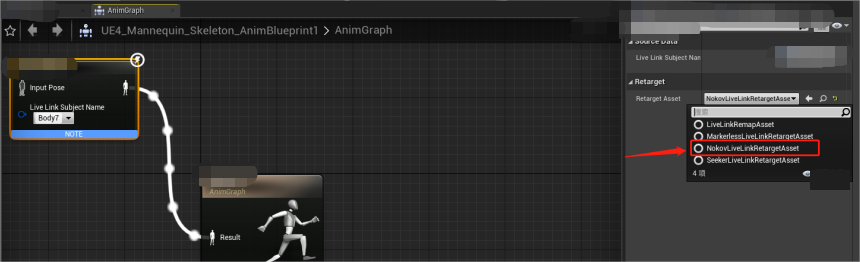
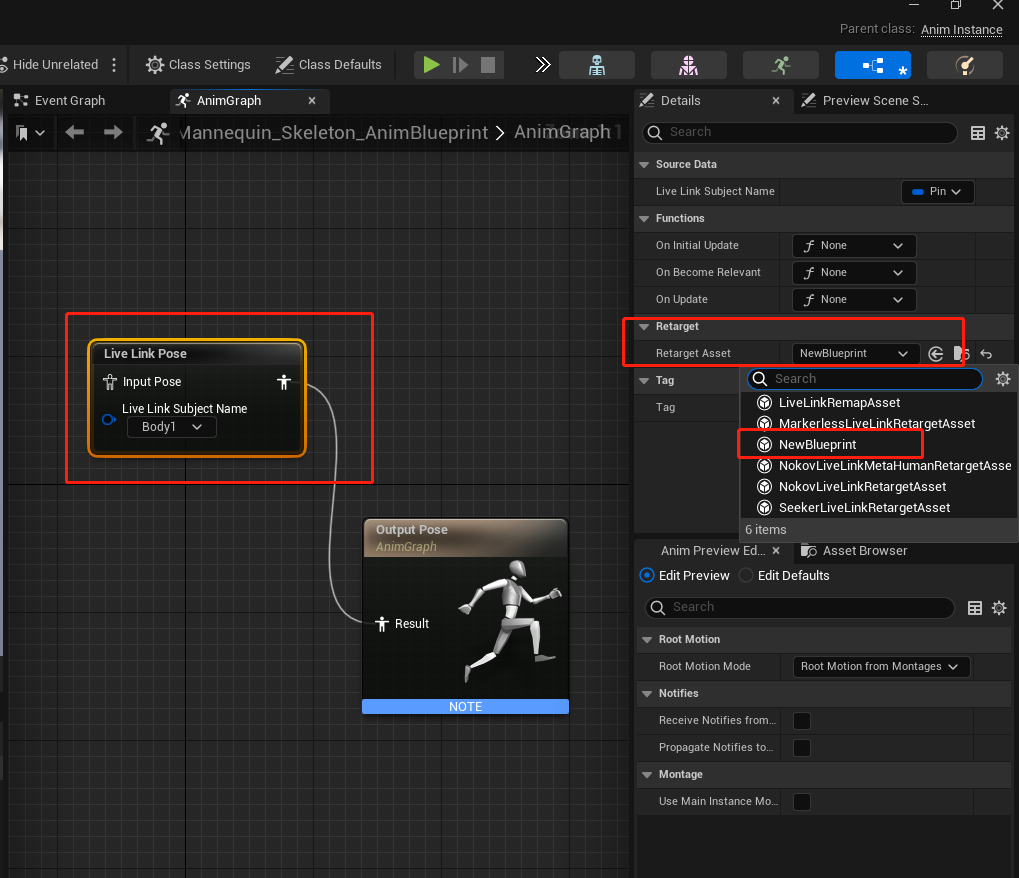
Right-click in the Animation Blueprint, search for "Live Link Pose, " and double-click to open it
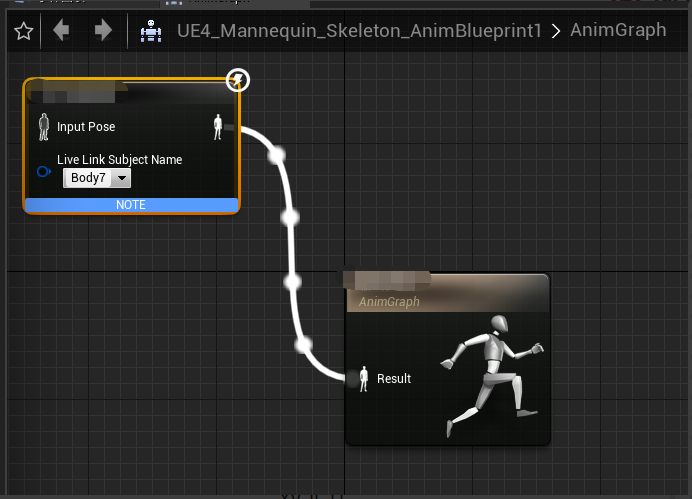
In the "Live Link Pose, " select the name of the target MarkerSet in "Live Link Subject Name" to drive the motion of
the model in UE4 with that MarkerSet. Connect "Live Link Pose" to "Output Pose" by dragging. On the right side,
select Retarget, then Retarget Asset, and choose NOKOVLiveLinkRetarget Asset.
Ensure that the human MarkerSet in XINGYING software is in a T-pose position. Click the Compile button in UE4. When
the human MarkerSet in XINGYING starts to move, the model in UE4.26 will be driven and move synchronously.
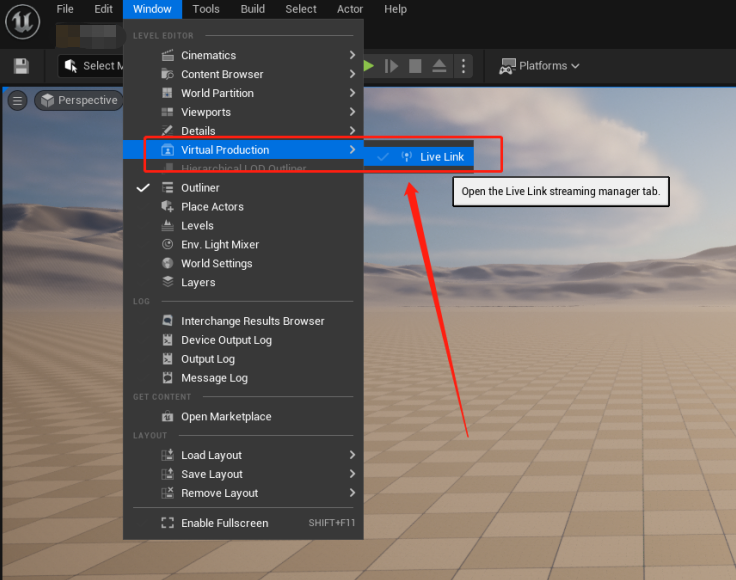
The operation steps for UE_4.27, UE_5.0, UE_5.1, UE_5.2, UE_5.3 engines are the same as for UE_4.26. The
difference is that for the UE_4.27 engine, you choose Window -> LiveLink and for UE_5.0 and later versions, you
choose Window -> Virtual Production -> LiveLink .
Introducing Human Data with Skeletal Redirection into UE
Data from XingYing can be directly integrated into UE to drive the human model through a plugin. However, when there
is a significant difference between the model and the body's motion, driving the model directly may lead to issues
like sliding steps. In such cases, you can bind and redirect through MotionBuilder, then drive the human model in UE
via MotionBuilder's UE plugin (MotionBuilder LiveLink), which can be downloaded from the UE official website or
obtained by consulting NOKOV engineers. Alternatively, you can import the human model into XingYing and enable the
redirection function. After the data is transformed, the output can bypass MotionBuilder and directly drive the model
in UE. For specific operation steps on driving the model using XingYing's redirection function, refer to section "
Fifteen, Data Redirection".
First, create a human model in Live mode in XINGYING software or load human data in Edit Mode. Use the model asset
import feature to import an FBX or HTR model file and perform skeletal redirection. For detailed operation steps,
please refer to the section "Fifteen, Data Redirection" above;
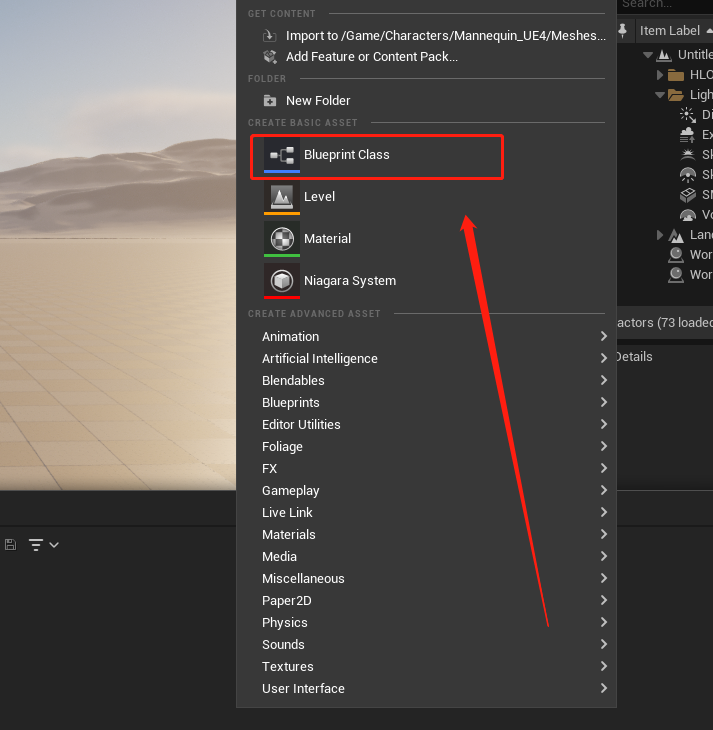
After redirecting the human skeleton in XINGYING, enable "Redirected Data" in the settings. Open UE, import the model
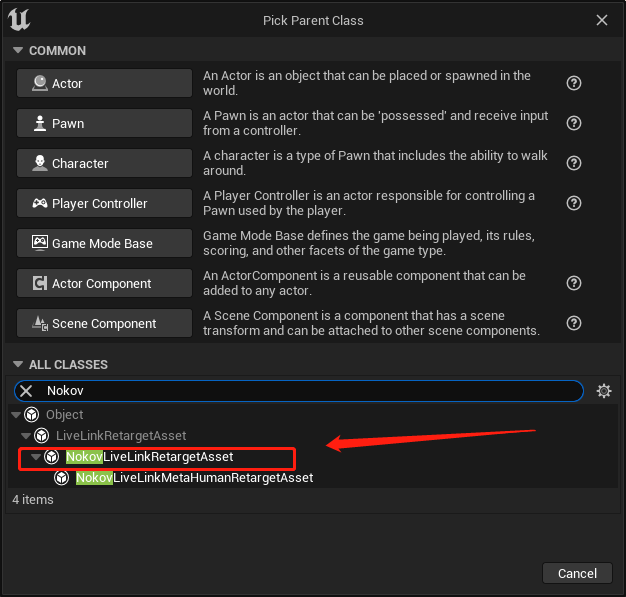
file with skeletal redirection done in XINGYING into UE, right-click in an empty space, select Blueprint Class
input "NOKOV" in the pop-up window's text box, select "NOKOVLiveLinkRetargetAsset", and click Select Name the
Blueprint Class, if not renamed, the class will default to the name "NewBlueprint". You will see that a Blueprint
Class with a cube icon has been successfully created in the content side menu.
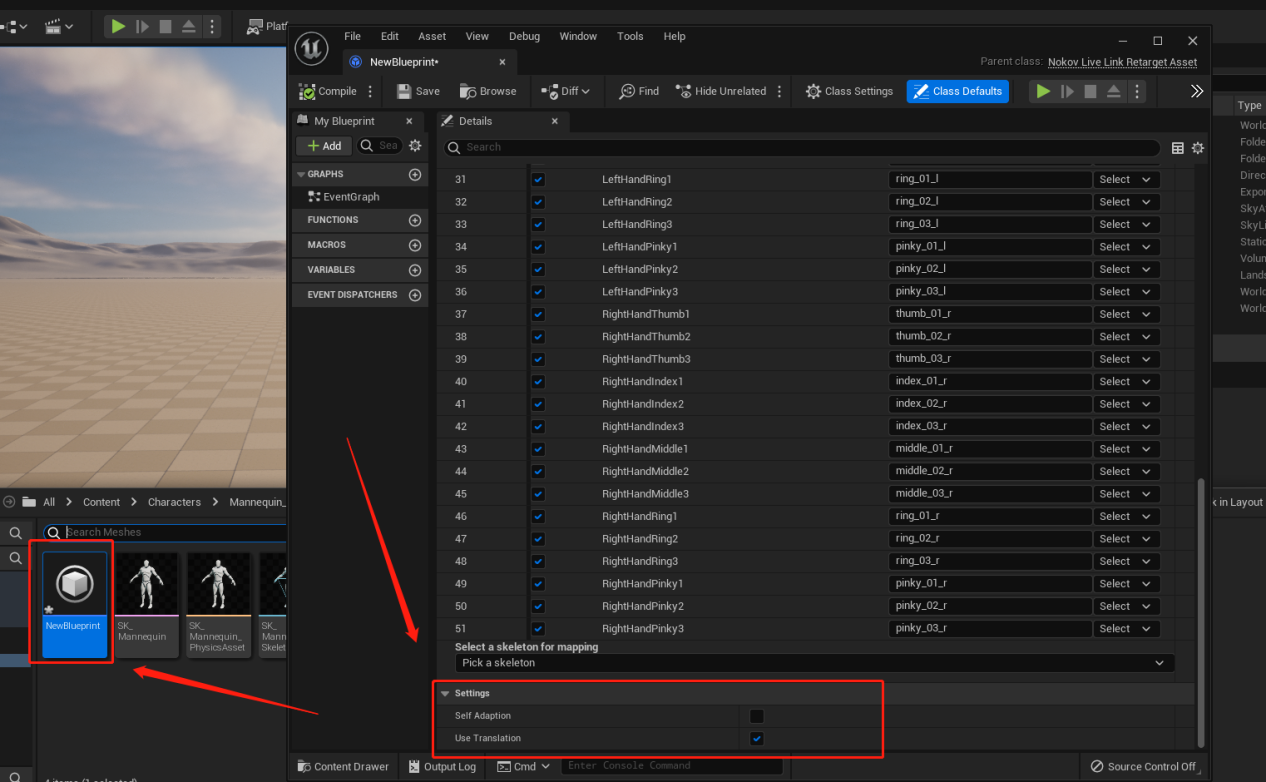
Double-click on the Blueprint Class you just created, and you will see two options for "Self Adaptation" and "Use
Translation" at the bottom of the popup window. The "Use Translation" option is checked by default, and the "Self
Adaptation" option is unchecked by default. If you are not using skeletal redirection to drive the UE model, check
the "Self Adaptation" option and uncheck the "Use Translation" option, click Save, and then Compile. If you are using
skeletal redirection, ensure the "Use Translation" option is checked and the "Self Adaptation" option is unchecked;
click Save, then Compile. Driving the UE model with redirected human data and checking the "Self Adaptation" option
may cause abnormalities in the model's skeleton in UE.
To drive the UE model using the skeletal redirection feature, and after unchecking the "Self Adaptation" option in
the Blueprint Class, you can refer to steps 5-8 above to drive the model. The only difference is that you need to
select the name of the Blueprint Class with the cube icon (that has the "Use Translation" option checked) from the "
Retarget—Retarget Asset" drop-down menu on the right side of the window After selecting it, click Compile. When
XINGYING software plays and the MarkerSet starts to move, the model in UE will be synchronously driven.
If you are not using skeletal redirection to drive the UE model, in the Blueprint Class check the "Self Adaptation"
option, uncheck the "Use Translation" option, and select the name of the Blueprint Class with the cube icon (that has
the "Self Adaptation" option checked) from the "Retarget—Retarget Asset" drop-down menu. After selecting, click
Compile. When the XINGYING software plays and the MarkerSet starts moving, the model in UE will be synchronously
driven.
When driving the UE model with redirected human data, ensure that the "Use Redirected Data" feature in XINGYING is
enabled. If it is not, enable it, then disconnect and re-establish the LiveLink connection between UE and XINGYING.
Failure to do so may cause inconsistencies between the human data and the SDK's information, leading to abnormalities
in the UE model's skeleton.
Double-click the created Blueprint Class to open it .
The NOKOV Skeleton Mapping table displays XINGYING's human skeleton names on the left and the UE model skeleton names
on the right. To edit the list, select the "Enable skeletonMapping" checkbox in the NOKOV Skeleton Mapping option.
Otherwise, the list will be uneditable. Each joint skeleton name has a checkbox on its left; if checked, the joint
skeleton will participate in data driving. If unchecked, it will not.
Click the Select button to the right of an individual joint (row), then enter the skeleton name in the search box to
perform a fuzzy match for the target joint. For example, if you select the "Spine1" skeleton and click the Select
button, you can enter "Spine" in the search box to perform a fuzzy match for the target joint.
Click "Select a skeleton for mapping" at the bottom of the window to display all the skeleton resources . Select a
skeleton resource to apply it and check if its skeleton names correspond correctly with those of XINGYING's human
model. If there's a mismatch, use the Select button to match the target joints via fuzzy search.
If you are using motion capture data to drive the UE model and the model's skeleton displays abnormalities or
incorrect positions, this may be due to some skeleton names being inconsistent with those in the XINGYING software,
leading to abnormal skeletons in UE. In this case, check the mapping of the skeleton names. Double-click on the
created Blueprint Class, and check the skeleton joints on both sides in the NOKOV skeleton mapping list to ensure
they correspond correctly. If there's a mismatch, make the necessary changes, save, and click Compile. Then, select
the name of the modified Blueprint Class in the Retarget—Retarget Asset drop-down menu and click Compile to
successfully drive the model's movement.
To see the skeleton names and hierarchy of the model file imported into UE, double-click on the model, click on the
skeleton icon in the model window, and you will see a tree diagram on the right side showing the model's skeleton
names.
When selecting a part of the model's skeleton from the skeleton name tree diagram, the model will display the
specific location of that skeleton on its body. This method is used to verify that the UE skeleton names correspond
correctly with the XINGYING human model skeleton names. For example, select the UE model's forearm skeleton and check
in the NOKOV skeleton Mapping list if the UE forearm skeleton name corresponds correctly with the XINGYING human body
forearm skeleton. If you find that the UE forearm skeleton is incorrectly mapped to the XINGYING body upper arm
skeleton, copy the name of the forearm skeleton from the UE model and map it to the forearm skeleton of the XINGYING
body in skeleton Mapping. Do this for each skeleton to ensure all names match correctly. After completing the checks,
click "Save." You can view the XINGYING human model skeleton positions and their names by clicking the "Joints" list
in the XINGYING assets panel.
If the skeletons are correctly mapped between XINGYING and the UE model but the model still shows abnormalities in
UE, please contact our technical engineers for assistance.
When using the XINGYING plugin to drive a model in UE, if XINGYING loses the human body and re-recognition does not
display the model in the UE scene, this issue is caused by a refresh problem in the UE engine. To resolve this refresh
issue, after linking the Live Link Pose to the Output Pose to drive the model in the Animation Blueprint, you also
need to add nodes in the event graph of the Animation Blueprint and connect them. Doing this can solve the problem of
the UE engine not refreshing.
.png)
.png)
.png)
.png)
.png)
.png)