Open Settings - Other settings, turn on the option to connect the optical camera, and turn on the "Markerless" switch
in Intelligent Settings.
Click the connect lens button, set the calibration axis to be upward along the Y-axis, and place the long axis of the
L-shaped calibration rod facing the placed AI camera. Next, perform basic calibration on the optical lens. For
detailed instructions on basic calibration, please refer
to.https://app.gitbook.com/s/fFOzbZzqEIXtcMJqykWS/ba-biao-ding-fen-lei/er-ji-chu-biao-ding
After the calibration of the optical lens is completed, place the L-shaped rod in the visible area of the AI camera.
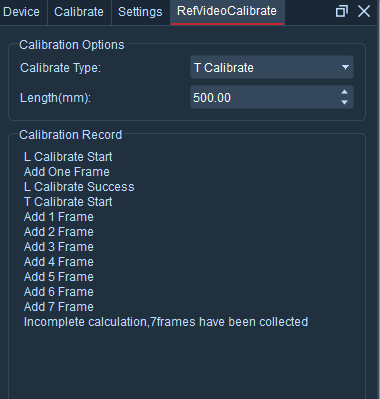
Open the reference video view, click View - Reference Video Calibration, select "L Calibration", click the "Freeze
Frame" button at the bottom of the calibration panel. Next, click the four Marker balls on the L-shaped rod in the
reference video view of each AI camera. After completion, click the "Add Frame" button. At this time, the calibration
record will print a prompt of "L calibration successful".
The calibration type in the reference video calibration panel will automatically select "T calibration". Enter the
length of the T-bar used for calibration this time in the rod length input box.
Click the "Start Calibration" button. The calibrator holds the T-bar and stands still at a selected position. Click
the "Freeze Frame" button. In the reference video view of each AI camera, click the three Marker balls on the T-bar.
After clicking, click the "Add Frame" button. After adding one frame of calibration data, the calibrator adjusts the
position again and adds sample frames according to the above operations until the calibration result is obtained. The
calibration result is recommended to be at "good" or above. If the result is "poor", we recommend that you
recalibrate. During the calibration process, the current calibration status and the number of added sample frames will
be printed on the panel.
After the above steps are completed, the optical lens and AI camera have been calibrated. If they are used
simultaneously, it is also necessary to keep the origin positions of the optical lens and AI camera consistent and
calibrate the origins of the optical lens and AI camera respectively.
Place the L-shaped calibration rod in a position that can be seen by both an optical lens and an AI camera. Then
perform origin calibration on the optical lens and also on the AI camera. It should be noted that the position where
the long axis of the L-shaped calibration rod is facing determines the direction in which the model faces when
creating a human body.
.png)
.png)